Official GuideFirst Connection
Shadowrocket Quick Start
Add existing connection details, choose Global Routing, then verify access. Follow these five steps for a connection you can check and repeat.
Have either a working subscription URL or a complete set of server details ready; you do not need to use both methods. The official screenshots help identify interface elements. Server names and available entries depend on your own configuration.
01 / ADD
Add a server / Import a subscription
Put the details in the SERVER group on Home, then choose the entry to use.
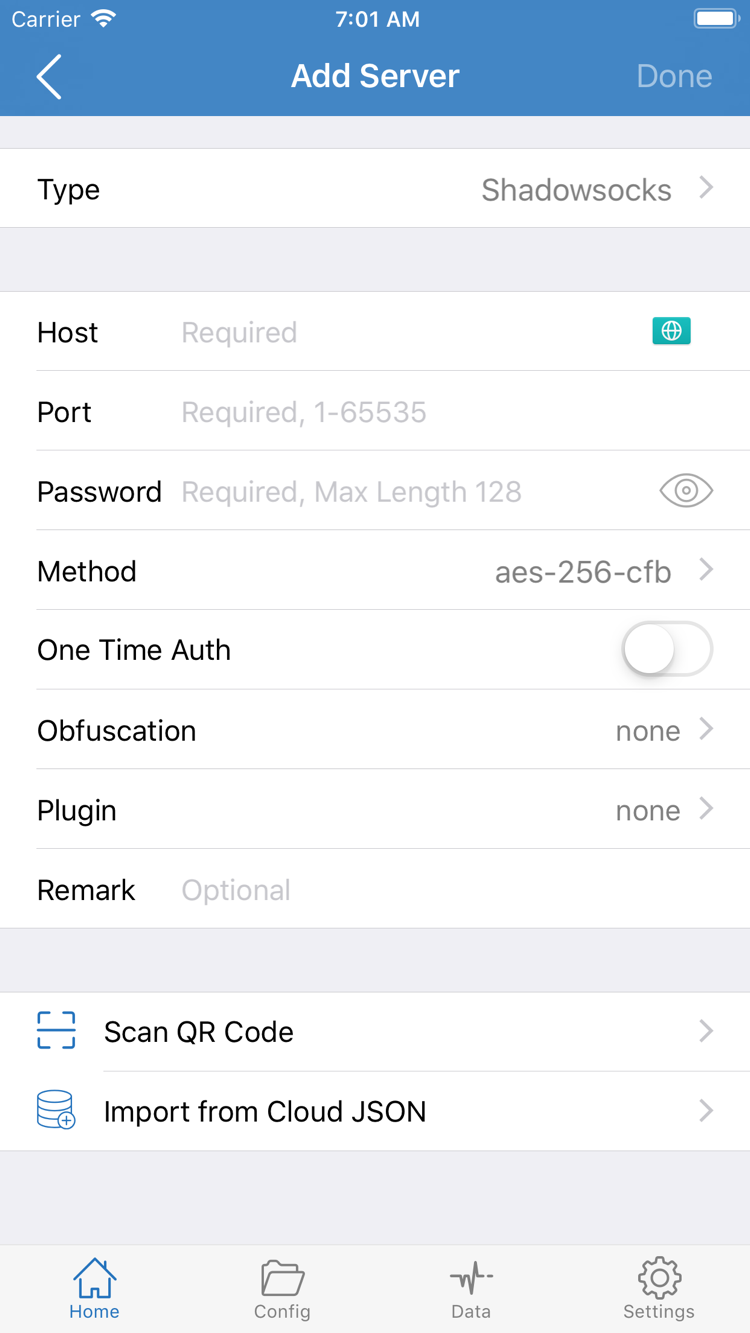
Open Shadowrocket and go to Home. The SERVER group may be empty the first time you use the app. Tap Add Server to open the add screen. Check Type first, then choose the type that matches the details you have. A subscription URL, a share link for a single server, and a regular webpage URL are different things. If you are unsure what your information is for, check the instructions from your service provider instead of repeatedly switching types.
Existing subscription link: choose Subscribe
In Add Server, open Type and choose Subscribe. Enter the complete subscription URL in the corresponding URL field, then add a name that will help you identify it. Keep the path and query parameters when copying the URL. Remove any spaces or line breaks before or after it, and do not copy only the domain. Save and wait for the subscription content to load. Then return to Home and check that server entries appear under the subscription group. If you see the subscription name but no servers, check the result using step five before turning on the connection.
Subscriptions are generally used to manage multiple servers. To update one later, use the existing subscription entry rather than adding the same URL again. If the number or names of servers change, confirm the update succeeded before selecting an available entry. A successful fetch only means the URL returned importable content; it does not mean every server in it is connectable.
Existing single server: check each detail
If your service provider gave you details for a single server, choose the corresponding protocol under Type, then enter Host, Port, and the authentication information required by that protocol. For example, Shadowsocks requires the correct Password and Method. Other protocols may use different fields; do not use one protocol's details with another type. Do not add a webpage prefix to Host without a reason. Match Port to the information provided, and check the Password for capitalization and extra spaces when copying.
If you already have a QR code, use Scan QR Code at the bottom of Add Server and allow camera access when prompted by the system. Import from Cloud JSON is only for configuration data intended for that entry; it does not work with every subscription URL. Whichever import method you use, check Type and the key fields before saving. After saving, return to Home, tap the server you plan to use, and make sure the selection indicator is on the correct entry.
At this stage, success means that you can see and select a server, not that you are already online. The next step determines how requests are handled by that server. For a full explanation of protocol parameters, continue to the beginner-to-advanced guide. For your first setup, use the details provided by your service provider.
02 / ROUTING
Choose a Global Routing mode
The server determines where the connection goes; Global Routing determines how requests are handled.
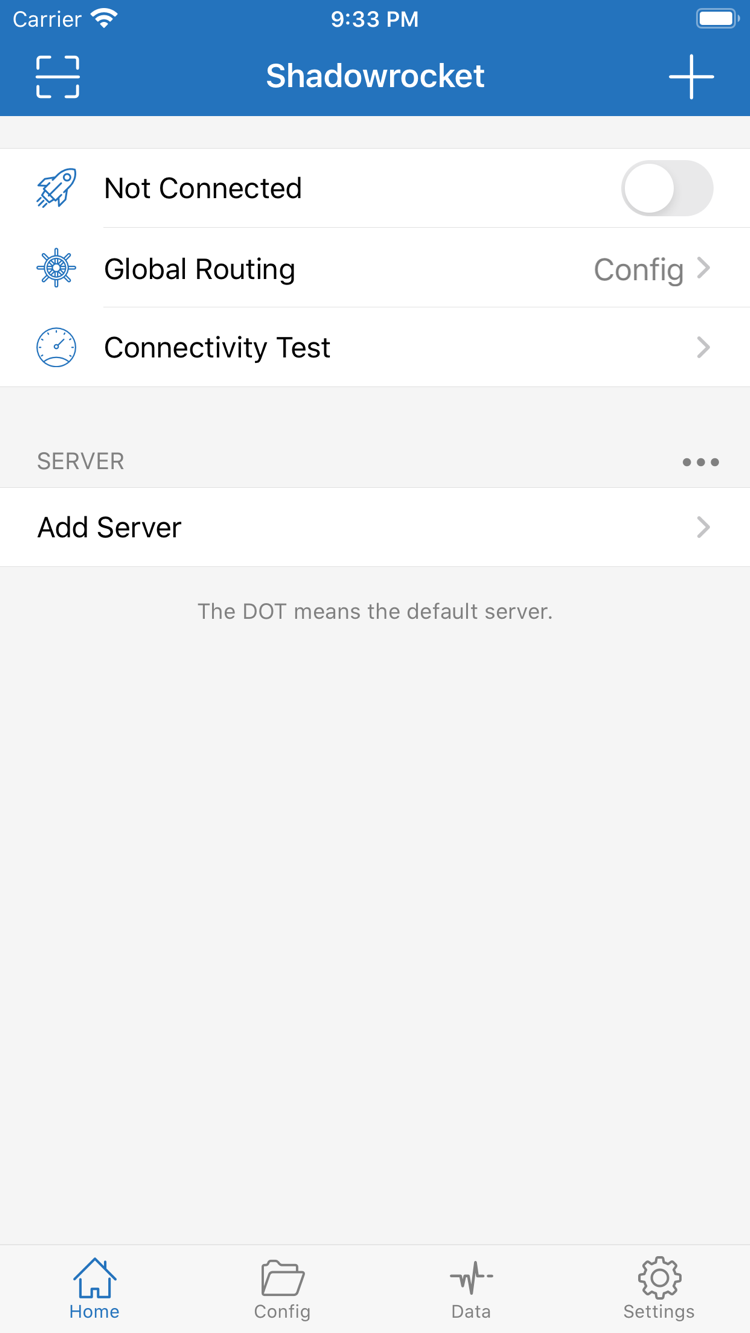
Return to Home, tap Global Routing, and review the three options: Config, Proxy, and Direct. Before connecting for the first time, decide whether you want to test the server itself or the results of your existing rules. Do not change the server, rules, and DNS at the same time without knowing the current mode; if something goes wrong, it will be difficult to identify the cause.
Config: follow the rules in the configuration file
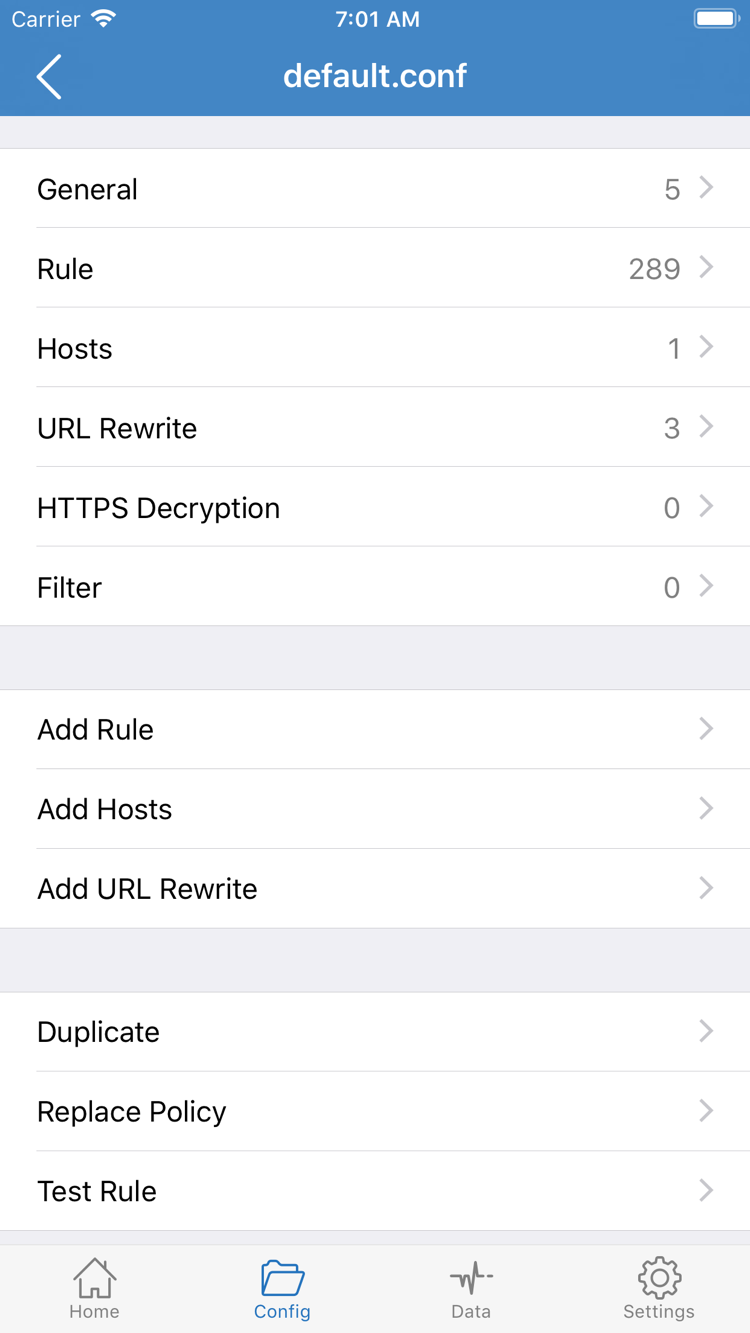
With Config selected, requests are handled according to the rules in the current configuration file. Open Config and confirm which file is in use. The configuration editor has sections such as General, Rule, Hosts, URL Rewrite, and HTTPS Decryption. For a first setup, focus on Rule and confirm that the existing rules match your needs. If you do not have a specific need, you do not have to enable other sections or change every setting just to connect.
The snippet below illustrates the order: requests matching example.com and its subdomains use PROXY; unmatched requests are sent to DIRECT by FINAL. example.com is a sample domain, not a server you need to connect to or a complete configuration for your needs. Rules are matched from top to bottom, with FINAL as the fallback. If an earlier rule matches the request, later rules do not select a different policy for it.
[Rule]
DOMAIN-SUFFIX,example.com,PROXY
FINAL,DIRECT
Proxy and Direct: use them for a specific test
Proxy forwards requests handled by the client in Proxy mode. It is useful for checking whether the selected server can access a target. Direct connects requests directly to their destination without using a proxy server; use it as a comparison when you need to check whether the current network can access the destination on its own. Global Routing is not a switch for a specific app; it describes how the current client handles requests.
If you have not confirmed that the rules are correct, use Proxy to test the connection and access first. Once you have confirmed that the server works, switch to Config and check whether the expected routing takes place. If access fails only in Config but works in Proxy, check the current configuration, rule order, and matching policies before removing the server. For a fuller explanation of rules, see the systematic usage guide.
03 / CONNECT
Turn on the connection
Confirm the server, mode, and system permission before connecting for the first time.
Return to Home and check the SERVER group to confirm the entry you want to use is selected. Then check that Global Routing is still in the mode you chose in step two. Not Connected at the top of the screenshot means there is no active connection. Turn on the connection switch at the top and wait for the status to change. Avoid switching servers or tapping the switch repeatedly while it is connecting so you can observe the full result.
On first use, the system may ask for permission to add a VPN configuration. Confirm that the request was initiated by Shadowrocket, then follow the prompts to allow it and complete device passcode or biometric authentication. This permission establishes a system network extension connection; it is not a subscription sign-in and does not provide missing server details. If you previously denied permission, start the connection again in the app and check the system prompts to see whether the VPN configuration has been added.
If another VPN connection is already active on your device, stop it before retrying to avoid competing for the system connection. Managed work devices may also have organizational restrictions. If you cannot add or enable a VPN configuration, check the device management requirements rather than assuming every permission issue is a server problem.
Even after the top of the screen shows that you are connected, do not end the check based on status alone. The connection status means the system connection has started; it does not prove that every website, rule, and network condition is working properly. Keep the current server and mode unchanged and run a real access test in the next step. If the switch immediately turns off again, note the message displayed and start troubleshooting system permissions and server details in step five.
04 / VERIFY
Verify the connection
Consider test results, actual access, and rule matches together.
Run Connectivity Test on Home and check whether the selected server returns a result. The test reflects connectivity for its current method and target; it is not the same as the experience in a browser, video app, or other application. A latency value does not prove that authentication details, website access, and all requests are working. A timeout does not necessarily mean the server is entirely unavailable; consider the test method and network environment.
Next, open a browser and visit a website you actually need to access. Check that the page loads fully, not just that a cached title appears. Choose a page you can revisit and refresh it once. Return to Shadowrocket and check for new requests using traffic changes in Data or available connection records. An increase in traffic is only a clue; also consider the policy applied to the target request.
With Config selected, test requests expected to use PROXY and requests expected to use DIRECT separately. If only one type fails, check the relevant rule conditions and order. DNS requests, images, and other page resources may use different domain names, so a loaded main page does not prove that every resource on it used the same policy.
To compare network environments, record the result on Wi-Fi first, then switch to a cellular network and repeat the same visit. Keep the server, mode, and target unchanged, and change only one condition at a time. When testing is complete, restore Global Routing to the mode you normally need. If access works only in Proxy, continue checking the configuration. If it fails on both networks, focus again on server details, service status, and error messages.
05 / DIAGNOSE
Check settings by failure stage
Start at the step that failed, narrow down the cause, then change a setting.
No servers appear after importing
First confirm that you copied the complete subscription URL, not your service provider's account webpage. Check whether the link has expired, whether query parameters are missing, and whether the current network can retrieve the subscription content. If the response is a sign-in page or an error, the client cannot create server entries from it. Confirm the subscription status and format with your existing service provider, then retry the update on the original subscription. Avoid adding several copies of the same subscription, which makes it harder to tell which entries came from each import.
The connection switch will not stay on
Check first that the system VPN configuration permission was granted and that no other active connection is interfering. Then return to Add Server and compare Type, Host, Port, and authentication fields with the original information. Pay particular attention to a missing port, trailing spaces in the password, or an incorrect protocol type. For connections that require TLS and related settings, check the fields specified by your service provider. Do not troubleshoot by disabling verification at random. Save any changes, return to Home, select the entry again, and test it.
Connected, but pages will not load
First determine whether no destinations work or only one website has a problem. Keep the server unchanged and compare access in Proxy and Config. If only Config fails, check Rule order, the FINAL fallback policy, and which configuration file is actually in use. If both fail, verify the service status and protocol details again, then consider DNS or current network conditions. Do not change several settings at once without recording what you changed.
Collect useful details in Settings
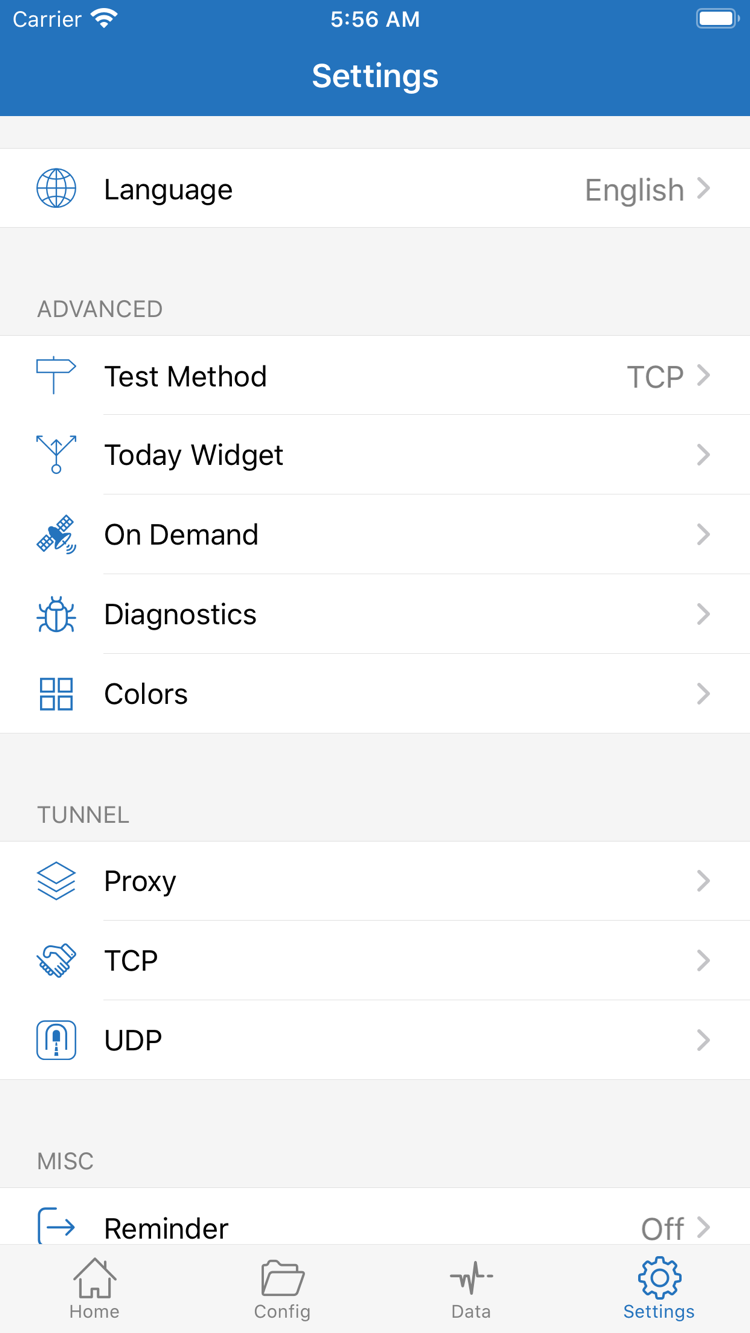
Open Settings to find items such as Test Method, On Demand, and Diagnostics. Test Method affects how connectivity tests are evaluated; do not switch it repeatedly just to get a lower number. During initial troubleshooting, you can temporarily stop On Demand from triggering automatically, then manually connect and disconnect once to rule out automatic reconnection as a source of confusion. After confirming the basic process works, restore your usual on-demand settings.
For further troubleshooting, review the available diagnostic information in Diagnostics and note when the issue occurred, the network type, the Global Routing mode, and the error text. Before sharing screenshots or logs, redact subscription URLs, passwords, authentication details, and other account information. Share only the necessary excerpts with the relevant support contact; do not publish your complete configuration. For more questions, see the FAQ by topic. For a systematic explanation of parameters, rules, and routine maintenance, see the beginner-to-advanced guide.
After troubleshooting, repeat the real access test in step four. Before restoring your usual configuration, confirm that any temporary changes to the mode, test method, and On Demand settings are still appropriate. This gives you a clear, tested starting point if another problem occurs, rather than leaving you to guess at every setting again.
Next steps after your first connection
Keep the configuration you have verified. Learn about rules, automatic connections, and maintenance as needed.